Online Booking Using the Client Portal
Online booking allows clients to request appointments directly through your Client Portal. This article covers the practice‑level settings that control how online booking works, including service locations, appointment types, availability, and the option to hide your physical office address.
ℹ️ Online booking settings can be managed by administrators and practitioners with the appropriate permissions.
In this article:
- Enabling Online Booking
- Adding Online Booking to Your Website
- Managing Service Locations
- Setting Practitioner Availability and Booking Policies
- Using Date Overrides
- Creating Multiple Schedules
- Hiding Your Location Address in the Client Portal
- Optional: Adding a Location Description
- Online Booking From a Client's Perspective
- Accepting or Declining an Appointment Request
- Frequently Asked Questions
- Related Resources
Enabling Online Booking
To enable online booking, turn it on at the practice level.
ℹ️ When online booking is enabled and at least one practitioner has availability set for new clients, your Client Portal homepage will show an “I’m a new client” option. This allows new clients to request appointments without logging in.
To enable online booking:
-
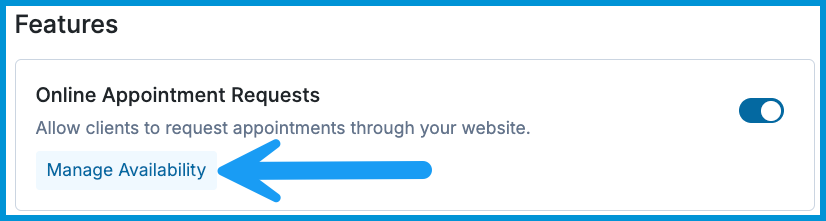
Go to Account Settings > Client Portal.
- Under Features, enable Online Appointment Requests.
Adding Online Booking to Your Website
Once online booking is enabled, you can add your Client Portal link to your website so clients can request appointments.
To find your Client Portal URL:
-
Go to Account Settings > Portal.
- Copy your unique portal URL.

💡 To send new clients directly to the booking page, add /request to the end of your portal URL.
Managing Service Locations
Your service locations determine what in‑person and telehealth appointments appear during booking.
To add or edit a location:
-
Go to Account Settings > Account > Service Locations.
-
Add a new location or select an existing one.
-
Choose whether the location is In‑Person, Telehealth, or both.
- For in‑person locations, enter the address exactly as you want it to appear in reminders.
Setting Practitioner Availability and Booking Policies
Availability determines when clients can request appointments. Each practitioner has their own available hours.
You can open the availability setup page from either:
-
Account Settings > Portal > Manage Availability.
-
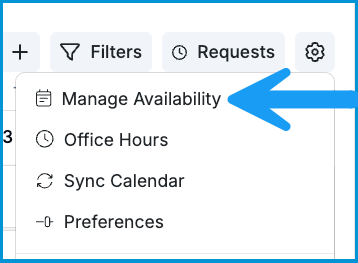
Calendar > Settings > Manage Availability.


Once you’re in the availability setup workflow:
-
Select the applicable practitioner.
-
Choose a schedule or create a new one using the + icon.
-
Set available hours for each day you offer appointments.
- Select the Available Services for this schedule. You can also:
- change the label shown to clients
- adjust the start‑time increments clients see during booking
-
choose whether the service is bookable for existing clients, new clients, or both
-
Choose the Location(s) where these services are offered.
- In Additional Settings, assign a schedule name and adjust booking policies such as:
- how close to the start time clients can book
- how far into the future they can schedule
- whether a buffer is required between sessions
-
the default timezone for the schedule
- Select Complete Setup.
ℹ️ These settings can be changed at any time from the Manage Availability page.
Using Date Overrides
Date overrides let you adjust your schedule for specific days, such as holidays or time off, and make one‑time changes without editing your regular weekly hours.
To add an override:
-
Open the schedule in the availability setup flow.
-
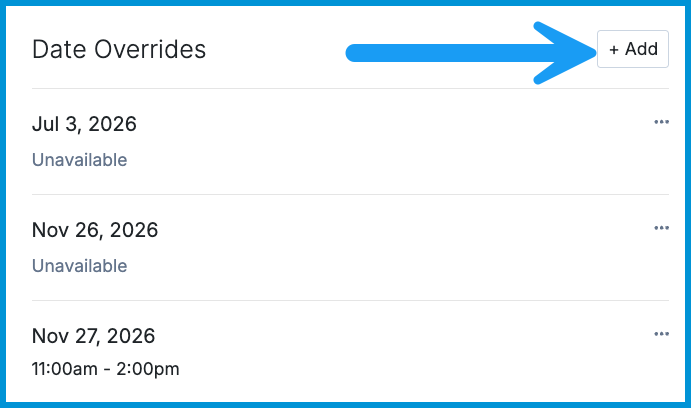
In the Date Overrides section, choose + Add.
-
Select the applicable date(s).
-
Set custom hours or mark the day as unavailable by clicking the trash can icon.
- Select Save.

Creating Multiple Schedules
Multiple schedules let practitioners offer different hours for different services or locations, and they’re also a helpful way to set specific availability or services for new clients.
To create another schedule, select the + icon and go through the availability workflow.

Here are some common ways practices use multiple schedules:
- Different hours by location: For example, one schedule for telehealth days and another for in‑person days.
- Different hours by service type: Separate schedules for individual therapy, family sessions, groups, or consultations.
- Offering limited or special‑purpose hours: A general weekly schedule plus a short block of availability for a specific service or day.
- Controlling which services appear online: Use separate schedules to show certain services in online booking while keeping others available only internally.
- Different availability for new vs. existing clients: A schedule that offers new‑client appointments and another that’s only for ongoing sessions.
Available Additional Settings
Some scheduling behaviors in the Client Portal are controlled by settings in your availability. These settings determine how far in advance clients can book, how much notice is required before a session, and whether sessions must be spaced apart by a certain amount of time. You can review these options from the gear icon in the upper right corner of your availability.
ℹ️ If a client reports that they cannot select a date or time you expect to be available, review your availability settings to confirm these rules.
Hiding Your Location Address in the Client Portal
If you offer in‑person sessions but prefer not to display your office address publicly, you can hide it from the Client Portal homepage.
To hide your address from the homepage:
-
Go to Account Settings > Account > Service Locations.
-
Scroll to your physical location(s).
-
Turn on Hide address in the Client Portal.
When this setting is enabled, your address is hidden on the Client Portal homepage. Clients see a placeholder stating “We'll share the address once your appointment is confirmed.”

Optional: Adding a Location Description
If you’d like to fine‑tune what clients see during booking, you can optionally add a Description to each location. This field is completely optional, and anything you enter here appears to clients who can view that schedule during booking.
To edit the location description:
-
From the Manage Availability workflow, choose the applicable schedule.
-
Navigate to Edit Location.
-
Under each physical location, edit or remove the Description as needed.
- Select Save.
🔔 If you’re using the “Hide location address in client portal” setting, avoid entering your address in the Description field. Anything added here will still appear to clients during booking.
Online Booking From a Client's Perspective
Clients can request, view, and cancel appointments through the Client Portal. For a complete walkthrough of what clients see during the booking process, including requesting and canceling appointments, see Appointment Management.
💡 Want to see what clients experience when booking? Create a test client using your own email address and invite them to the Client Portal to try the process yourself.
Accepting or Declining an Appointment Request
Appointment requests submitted through the Client Portal appear in your calendar for review. For details on how to review, accept, or decline requests, see Managing Appointment Requests.
Frequently Asked Questions
Why don’t I see the “I’m a new client” button on my Client Portal homepage?
The I’m a new client option only appears when online booking is enabled and at least one practitioner has availability set for new clients. If no schedules are available for new clients, the button is hidden.
Why isn’t a practitioner showing up in online booking?
A practitioner will only appear if they have at least one active schedule with availability, services, and locations configured. Check their availability setup under Manage Availability.
Why aren’t any appointment times showing for a practitioner?
Times only appear if the practitioner has available hours that match the selected service, location, and booking rules. These rules include how far in advance clients can book, how much notice is required before a session, and whether sessions must be spaced a certain amount of time apart. You can review and adjust these settings in the schedule’s Additional Settings under the gear icon in the upper right corner of each schedule.
Can I control how far in advance clients can book?
Yes. Each schedule includes booking policies that set how soon before an appointment clients can book and how far into the future they can schedule. Adjust these in the schedule’s Additional Settings under the gear icon in the upper-right corner of each schedule.
Can I offer different hours for telehealth and in‑person sessions?
Yes. Create separate schedules for each location and set availability for the days and times you offer those sessions.
Can I limit which services clients can book online?
Yes. Each schedule lets you choose which services are available for online booking. Only the services included in that schedule will appear to clients.
Do clients see booking times in their own time zone?
Yes. Your availability is configured using the time zone set in your schedule, but clients viewing the Client Portal will see appointment times in their local time zone.
For example, if your availability is set in Central Time and a client in New York views your booking calendar, the times will appear in Eastern Time for that client.
Related Resources
For more information on online booking, check out these articles:
You can also check out this video on Managing Availability for Online Booking.